
WINDOW SCREENS
How to Replace a Window or Door Screen
Keep the bugs out: replace a torn screen yourself
A torn window or door screen is one of the easiest repairs you can make at home, and it keeps mosquitoes, flies and stink bugs outside where they belong.
The trick is keeping the frame square and straight while you stretch the new screen across it. Two simple shop-made braces handle that: a corner brace keeps the frame a true rectangle, and a middle brace keeps larger frames from bowing in at the center.
Learn how below:

Tools You Will Need:
- Break-down right angle corner brace – to hold one corner of the frame at exactly 90 degrees, so the frame stays a rectangle. Build one with the instructions below, or use a portable worktable top with two 1×4 boards permanently mounted at 90 degrees.
- 1/4″ wood strapping or lath, various lengths – to make the middle brace that keeps larger frames from bowing in.
- Extra-thick CA glue and accelerator – to lock the middle brace at the right length in seconds.
- Replacement screen mesh – big enough to cover the whole frame, past the spline groove on all four sides.
- Screen spline, assorted thicknesses – the rubber cord that presses the screen into the frame’s groove. Old frames vary, so have a few sizes on hand.
- Screen roller tool – to press the spline into the groove.
- Precision hook set or small flathead screwdriver – to pull out the old spline without bending the frame.
- Screwdriver – to adjust the wheels on sliding screen doors.
- Putty knife – to pop sliding screen door wheels in and out of the track.
- Tape measure – to check the frame for an hourglass shape.
- Utility knife – to cut spline and trim the extra screen.
- Sharpie or label maker – to record the spline size on the frame for next time.
- Vacuum – to clean out the sliding door track.
- Thin sheet or drop cloth – a flat, wrinkle-free surface to work on.
[Product links and affiliate note to be added.]
Build a Break-Down Right Angle Corner Brace
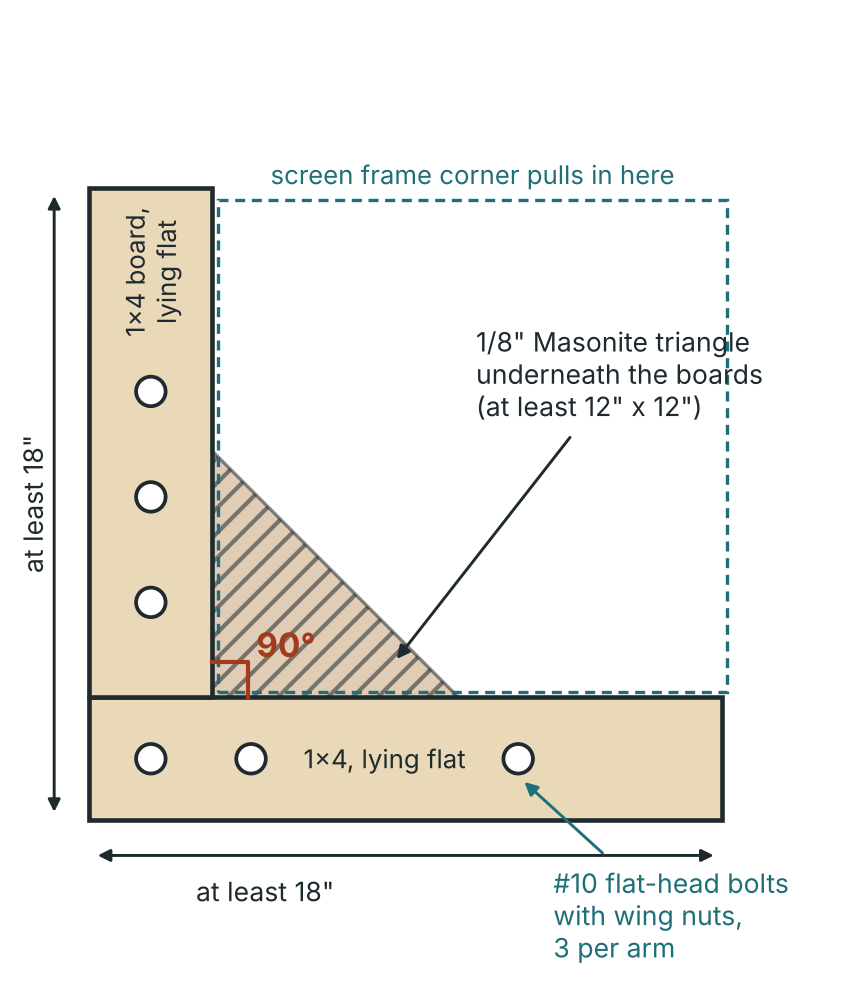
The corner brace holds one corner of the screen frame at exactly 90 degrees, so the frame stays a rectangle instead of leaning into a rhombus. Wing nuts let it come apart, so it stores flat.
Break-down right angle corner brace (top view)
Materials:
- Two 1×4 boards, each at least 18″ long
- 1/8″ Masonite, at least 12″ x 12″
- Six #10 flat-head bolts with wing nuts (three per arm)
To build it:
- Cut the Masonite into a right triangle, with the two square sides at least 12″ long.
- Lay the triangle flat. Lay the two 1×4 boards flat on top of it (not on edge), one along each square side, so they meet in an L at the corner.
- Drill three holes through each board and the Masonite underneath.
- Push a #10 flat-head bolt through each hole and thread on a wing nut.
- Before you tighten the wing nuts, check that the inside corner of the L is exactly 90 degrees.
- To store it, take off the wing nuts and stack the pieces flat.
Short on storage? Make it permanent instead. Mount two 1×4 boards permanently at 90 degrees on a portable worktable top. The inside corner of the boards does the same job.
The Middle Brace for Larger Screens
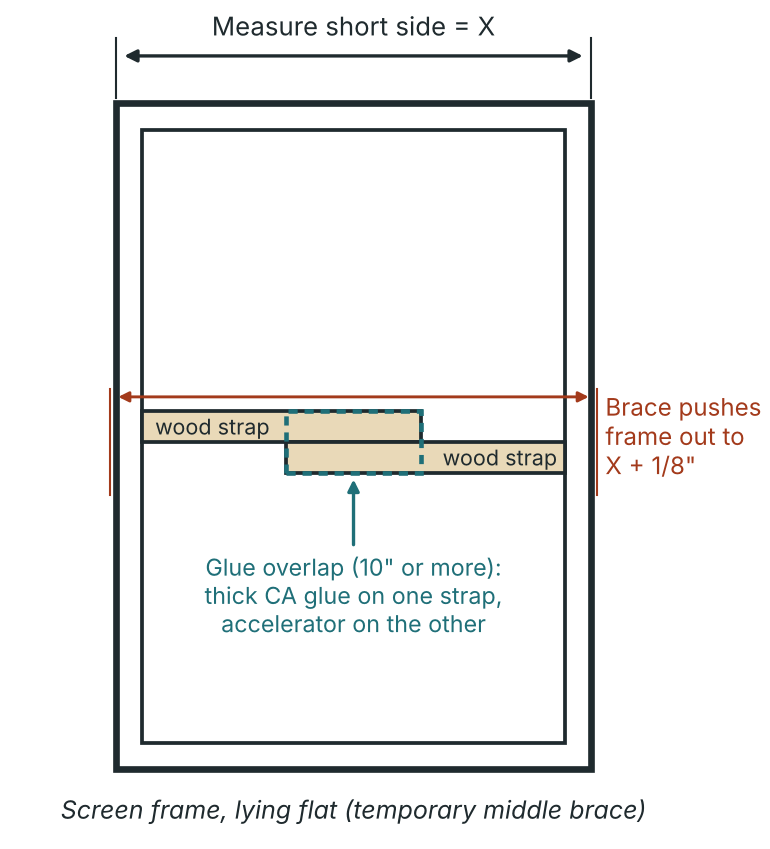
When you stretch new screen across a large frame, the long sides want to pull in toward each other. A temporary middle brace made from two strips of wood strapping holds the frame 1/8″ wider than its normal size, so it ends up straight instead of bowed in at the center.
Temporary middle brace on a screen frame
To set the middle brace:
- Measure the frame’s shorter side, outside edge to outside edge. Call that X.
- Lay two pieces of 1/4″ strapping across the inside of the frame, overlapping at least 10″ in the middle. Each end should touch the inside edge of the frame.
- Slide the strips apart until they push the frame’s outside edges to X + 1/8″.
- Glue the overlap: put extra-thick CA glue on one strip and spray accelerator on the other, then press them together. The joint sets in seconds.
- Leave the brace in place until the new screen and spline are installed. Remove it as you lift the frame off the floor or worktable.
Screen Replacement Steps:
Remove the screen
- Remove the screen and screen frame from the window or door opening.
- Sliding screen doors: loosen the wheel adjustment screws at the top and bottom, lift the door in the track, and pop the bottom wheels up into the door one at a time with a putty knife.
- Vacuum out the sliding track while the door is out.
Get the frame square and straight
- Lay a thin sheet or drop cloth flat on the floor with no wrinkles.
- Lay the screen frame on it, avoiding any seams. Use your tape measure to confirm the middle of the frame is the same width as the corners, so the frame hasn’t become hourglass-shaped.
- Carefully pull out the old spline with a hook tool or small flathead screwdriver. Go slowly so you don’t bend the frame.
- Pull one corner of the frame tight into the corner brace to confirm the frame is still a rectangle, not a rhombus.
- Larger screens: add the middle brace (see above) so the frame can’t bow in at the center.
Install the new screen
- Lay the new screen mesh over the frame and test spline thicknesses until one fits snugly in the groove.
- Label the spline size on the frame with a label maker, or write it discreetly inside the frame with a Sharpie. Next time, you’ll know exactly what to buy.
- Cut four short pieces of spline with a utility knife and use them to pin the screen at the corners. Leave a tail sticking up on each so they’re easy to pull out later.
- Check again with the tape measure that the middle width matches the edge width plus 1/8″.
- Starting in the middle of a long side, press the spline into the groove with the screen roller tool. Stiff metal screen may need the rounded side of the tool first to bend it into the groove.
- Continue out to both corners, pulling out the pinning pieces as you reach them.
- Do the opposite long side the same way.
- Do the two short sides the same way.
- Check the middle width one last time.
- Trim the extra screen with the utility knife.
Put it back
- Remove the middle brace as you lift the frame, with its new screen, off the floor or worktable.
- Return the screen to the window or door track.
- Sliding screen doors: lift the wheels into the track with the putty knife, then adjust the wheel screws so the door won’t pop out of the track when you use it.
Talk to us
Have any questions? We are always open to talk about your home and how we can help you.